How to Thread a Tank Cam Band Buckle
Correctly threading a soft cam band tank strap buckle is important to ensure your scuba cylinder is securly fastened to the BCD. If it's not the result can be the tank dropping out of the BCD while the diver is on the boat, or worse still, slipping out in the water.
The following instructions show just how easy it is to assemble this simple but vitally important item of scuba equipment. It's worth learning the process and practicing until it becomes second nature. Sure, there are usually numbers stamped on the buckle showing which bit goes where, but there is no substitute to knowledge and practice.
General Pointers
The tank strap that you will use to form a loop is secured to your BCD. One end has a large plastic buckle with a metal D-ring, attached to it and is around 15 to 25 cm (6-10 inches) long. The other end of the string is longer and has a hook-and-loop Velcro fastener. Usually, there is also tag or a diagram somewhere next to the strap to lead you through the stringing process.
Not all buckles are exactly the same, but the basic procedure for stringing them is very similar and consists of a few simple steps. Here is the most common correct way to thread the cam band buckle:
Step 1
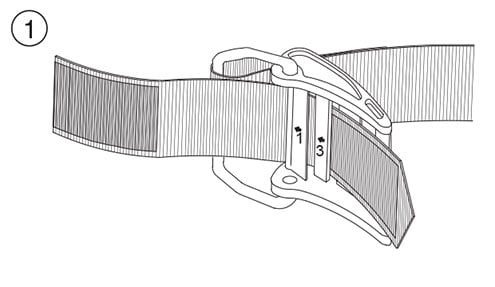
Following the arrow (1) insert the end of the belt starting from the inner side towards the external part of the buckle (between the sewn stirrup and the moving part) From the external side follow the arrow and go back to the inner side between the arrows (3 and 4).
Step 2
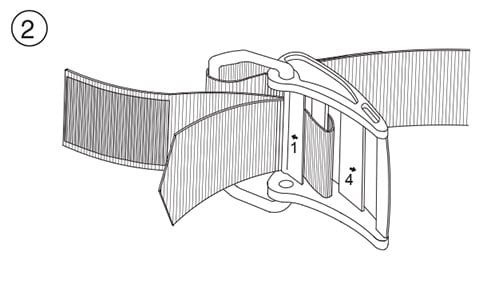
Pass through the opening marked by the arrow (3) and let the belt glide back through the opening marked by arrow (1).
Step 3
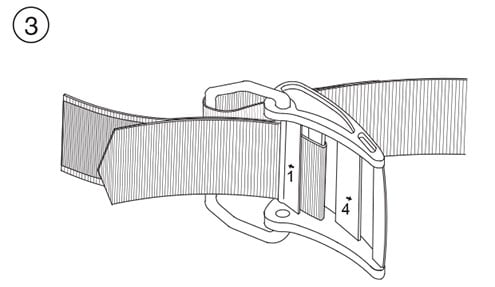
At this point stretch firmly in the indicated direction, so to let the belt firmly adhere to the tank. You can work the buckle up and down to help apply tension to the belt if needed.
Step 4
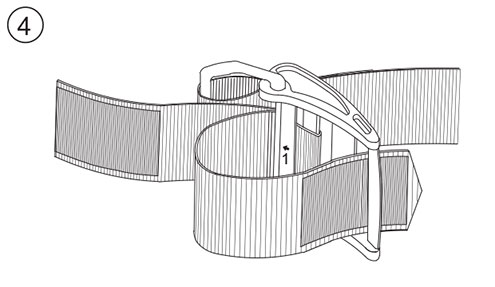
Keep the belt stretched, follow the arrow (4) and go back to the external side. Holding the buckle up at this point can assist in keeping the tension on the tank band.
Step 5
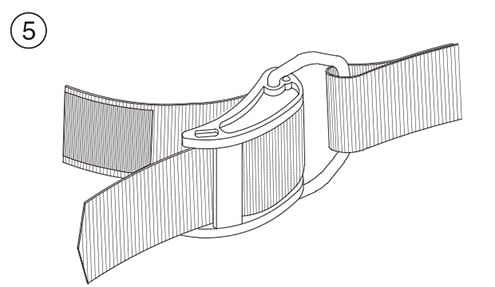
Pull firmly and let the buckle overturn.
Step 6
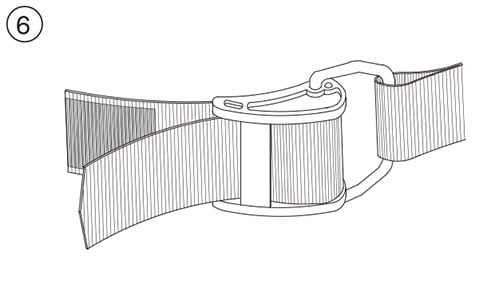
The buckle will close with a sharp snap, locking the BCD onto the tank.
Step 7
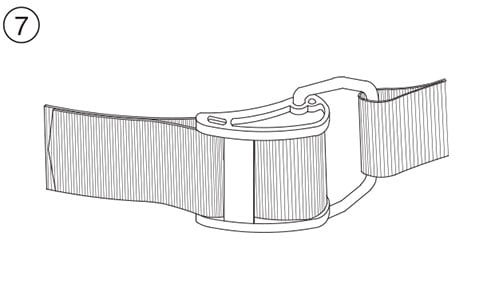
The fastening is now assured. Fix the exceeding end of the belt to the apposite Velcro strip sewn onto the belt. If it's tightened properly, you should not be able to move the webbing on the tank with force from your hands. You can also test for tightness by grabbing the BCD handle and shaking to determine if the tank is safely secured.
Helpful Tip: You can wet the strap prior to slipping it over the tank, as the strap tends to stretch when in the water. This tip is especially useful if you have a brand new BCD, or if the strap in your buoyancy compensator has become stiff from infrequent use.
Adjustments
In case you need to adjust the strap to fit a different sized tank, start by removing the strap from the end slot in order to make the process easier.
Then, if you need to make the tank loop smaller, simply push the necessary amount of strap from the tank loop back through the buckle and tighten the free end. In case you need a bigger loop, you'll have to adjust the strap while mounting it on the BCD. Place your cylinder in a vertical position and slide the strap over it. When it goes no further, force the buckle open and ratchet it a few times, at the same time exerting downward pressure on your BCD. This will make the tank loop larger and the strap will slide down to the desired position. Finally go over steps three to seven described above.
Remember, even though the procedure described here will apply to the majority of tank straps, there are buckles of a different type. So any time you work with a new BCD, read the owner's manual carefully and always double check if the strap is strung correctly.
Please download/view our guide on How to Thread a Soft Cam Band Tank Strap Buckle (PDF, 1 page, 86 Kb) and print to keep in your save a dive kit.
If you need great tank cam bands to properly secure your scuba cylinder onto your BCD, please see Cylinder Accessories / Parts.

